
How to: Paint Your Kitchen Aid Mixer
on May 21, 2012, Updated Jan 16, 2019
We are participant in the Amazon Services LLC Associates Program, an affiliate advertising program designed to provide a means for us to earn fees by linking to Amazon.com and affiliated sites. Please see my disclosure policy.
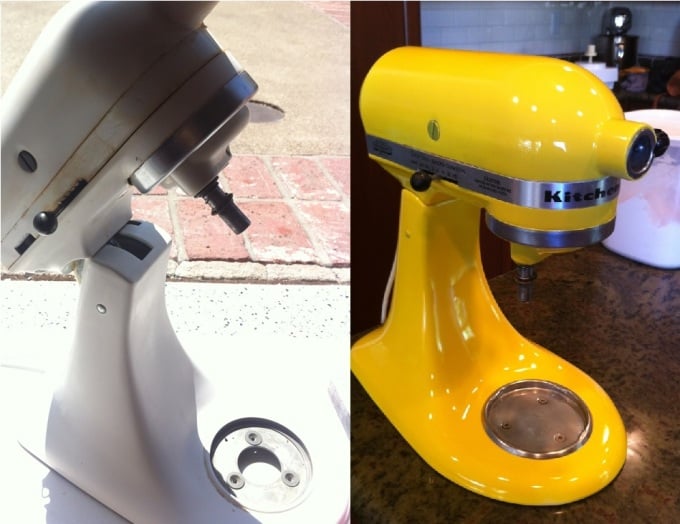
I love Saturdays. Don’t you? Saturdays with nothing planned, when you can look around your house and think, “what should I do today?” Today was just that kind of day, and I have already done 2 things I’ve wanted to do for a while. This first thing I did was paint my old Kitchen Aid mixer. This mixer is over 30 years old and works like a champ. My parents got it as a wedding present and it reminds me of my childhood. Then my mom got an awesome, huge, sturdy Viking mixer and it went into storage. I rediscovered it when I got an apartment in college and it became my mixer. Now, this mixer was cute, and I was lucky to have it, but who doesn’t want a colored mixer like Monica had in friends? Just me? Well either way I hadn’t even thought about painting it until recently, and now its all I could think about.
Therefore, an open Saturday meant I could finally paint it. AND a perk of living with the rents is that they had paint and supplies galore, so it cost me nada. My mom had recently bought some “john deer yellow” spray paint, and it was perfect.

I apologize in advance for my lack of before pictures, and a couple of steps throughout, but I was in the zone! I started out by cleaning it the best I could (30 years of baking can really build up). Then I took a hand sander to it and buffed it just so there was no shine, and took off all parts that I could.

I took a toothpick around all of the crevices and picked off as much grime as I could.

.

I then taped off all parts that I did not want to be painted, mostly just the metal parts and screws. Then I was going to take a picture, and responded to a few text messages instead (whoops!). Then I just started spraying. Did I mention I love spray paint? So easy and quick, and with a proper tape job it can make you look like you know what you’re doing! Fantastic

Then I just left it to dry for about 30 minutes (and tried to keep my dog from wagging her tail on it). After the wait, which I filled with my next project, I took the tape off and put the parts back together, and voila! Cutest. mixer. ever. Just the pop of color any kitchen needs!!


I just found this and I cannot wait to do the same thing to my mixer! I’ve wanted a yellow Kitchenaid forever! I just wondered how the paint was holding up, and if you’d tried to clean it after you painted it. Also, do you think the coverage of the spray paint is pretty good? My mixer is currently navy, so I’m trying to go from a darker color to a lighter color.
I have cleaned it and it hold up nicely! I also think the paint I used was good because it is ment for “farm equipment” so it is good on metal machinery. I think you should be fine painting a navy mixer as well, as long as you sand it well. You may have to do two coats, just make sure they are not too thick. Good luck and I hope it turns out well!!
Hey Kelsey,
My Kitchenaid mixer is probably the same vintage as yours, it’s also inherited and works just great. I’ve been lusting after a blue one as I just re-did my kitchen, but buying a new Kitchenaid for $350.00 is not an option. I contacted Rustoleum. They do make appliance spray paint, but only in a few rather blah colors, however they said that using the farm equipment paint that you used is perfectly safe. They have a color called Ford blue that will work just fine for me. Thanks for the inspiration, your helpful tips and also congratulations on a really jazzy makeover.
I was at Target the other day and saw a Bubble Gum Pink Kitchen Aide Mixer! I told my daughter, “I HAVE to have that!” But I already have a kitchen aid mixer that’s white. I think I am going to be a daredevil and try it in the PINK! Thanks so much for this information! (I asked my hubby if he thought I could spray paint the mixer and he said no) Too bad for him, I search it on the internet! Yay! Thanks again!
Hi, just wondering how your Kitchenaid Mixer paint job is holding up. I am just about ready to paint mine and am hoping to get feedback on how the farm equip. paint has performed.
Thanks!!!!!
Hi,
Just wondering if sanding the mixer makes it rough after you spray paint it?? or do u use something over the top of the paint to make it shinny??
also what did you use to sand it??
thankyou 😀
This is so awesome!!! Some questions was the mixer still smooth after you painted it? Did you use a sealer? What was the grit of sandpaper did you use? Its been about 11 months how has the paint held up? Please answer I would love to paint my silver one teal.
thank you for taking the time to document and post this. i am feeling empowered and will soon repaint my vintage K5-A that my mom used to make her own soap (which involved lye and many other paint-peeling ingredients!!!) So excited!
Hi all! Rustoleum was great for overall paintining but I found a website, mytouchuppaint.com that sells touch up paint for KitchenAids! It worked great for little scratches and didn’t require me to repaint the entire mixer. Happy Painting!
Hi, I am wondering if you were able o remove the chrome bowl clamp easily after removing the 3 screws. My mixer is from 1986 and I removed the screws and I can’t get it off of the base. I am going to repaint my almond mixer with the John Deere green paint and then I am going to apply Scooby Doo vinyl decals to it. I hope it comes out like I’m envisioning it!
Saved as a favorite, I love your web site!